Dynamic POS Panel Layout is about the functionality to rotate, for example a tablet from portrait to landscape, and at the same time automatically adjust its controls to the change.
Functional Overview
POS Panels now have new fields for Portrait Mode. The number and size of Rows/Columns can be different between Portrait and Landscape and Control Location and Spanning can differ between Portrait and Landscape mode.
Setup for Dynamic Layout Functionality
POS Panel
In the POS Panel there are a few fields that work with the Dynamic Layout functionality:

| Field | Description |
|---|---|
| General | |
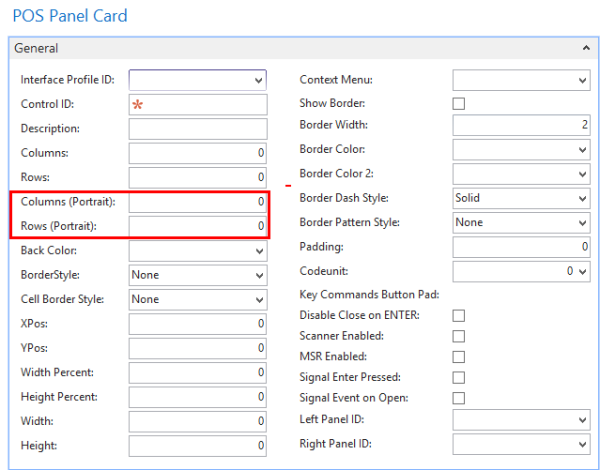
| Columns (Portrait) | If this number is set to a value higher than zero, the Panel will use this number as the number of Column in the Panel Layout. |
| Rows (Portrait) | If this number is set to a value higher than zero, the Panel will use this number as the number of Rows in the Panel Layout. |
| Panel Row/Column | |
| Options for Type Column (Portrait)” and “Row (Portrait)” |
To specify the size of Column/Row in Portrait Mode. |
| Panel Control Line | |
| Column (Portrait) | Column Position of this Control in Portrait Mode. |
| Row (Portrait) | Row Position of this Control in Portrait Mode. |
| Column Span (Portrait) | Column Span of this Control in Portrait Mode. |
| Row Span (Portrait) | Row Span of this Control in Portrait Mode. |
POS Menu
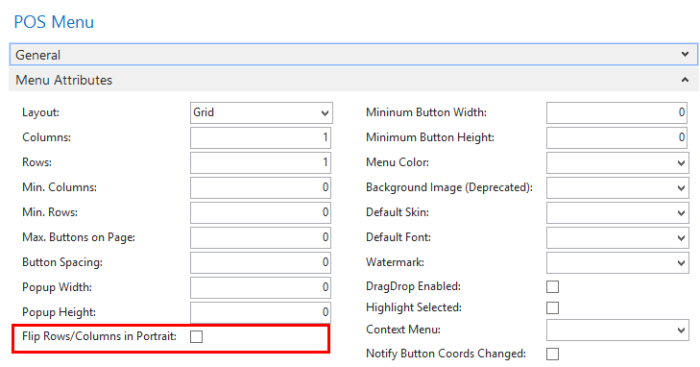
For the Menu Header there is one field that works with Dynamic Layout functionality:
| Field | Description |
|---|---|
| Flip Rows/Columns in Portrait: | A checkmark in this field will switch the number of Columns to number of Rows and vice versa when the POS Control enters Portrait Mode (POS height is greater than the width). Note that this will only happen when the POS is in Portrait mode, not when the Button Pad Control containing the menu is in Portrait mode. |
Use Case (Design the #POS Panel for Portrait Mode)
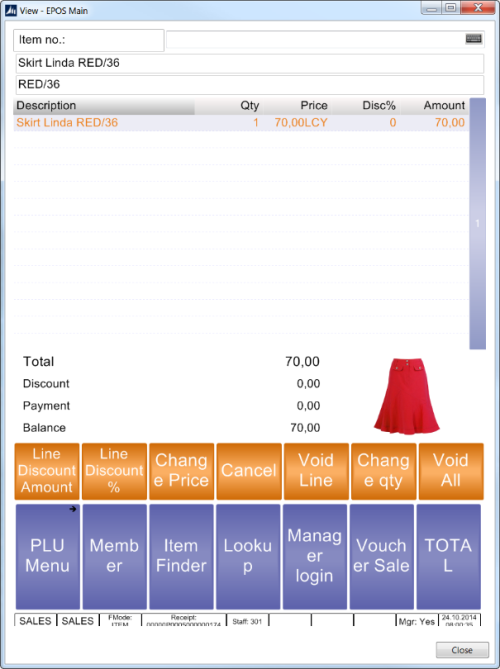
This use case explains how to modify the #POS panel for Portrait mode. We are using Terminal P0005 in Store S0003 (Fashion Store) of the Demo Data Company.
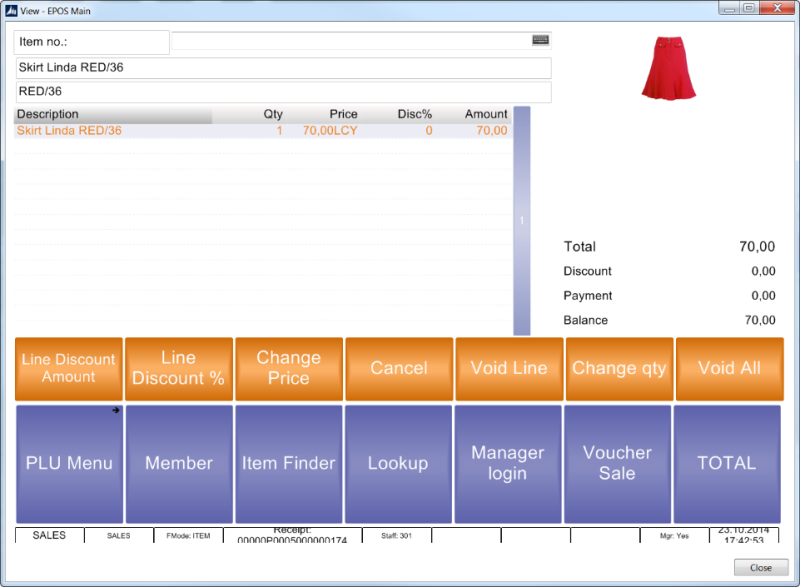
This POS Panel has 3 Columns and 7 Rows. To see outlines of Columns and Rows it is convenient to set the “Cell Border Style” to Inset Double, for example in the Panel Properties Card.
The Journal Grid Control spans over 2 rows and the Media Control showing the Image also spans 2 rows. The 3 menus in the bottom 3 rows span over the 3 columns of the panel.
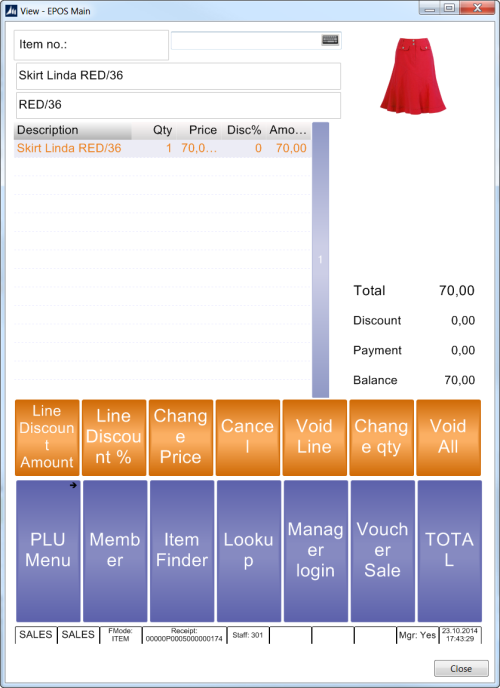
When this Panel is shown in Portrait Mode, the Journal Grid will become quite narrow and the Amount field is not showing properly etc.
What we want to do is to design this Panel specifically for Portrait Mode. To do this at runtime we need to make the height of the POS greater than the width, then right-click on any control and select Enter Design Mode.
The Watermark text indicating that the POS Control is in design mode will add # sign in front of the text to indicate that the POS Control is in Portrait Mode. This means that any design changes made will affect the Portrait Mode only.
The plan is to make the top controls (Journal, Info, and Input) of the panel span over all 3 columns. Then move the Media Control and Totals (Button Pad Control) under the Journal.

Right-click the Journal Grid and select the Control Span menu item. Select Row and 1 to make the Journal Grid span only 1 Row instead of 2.
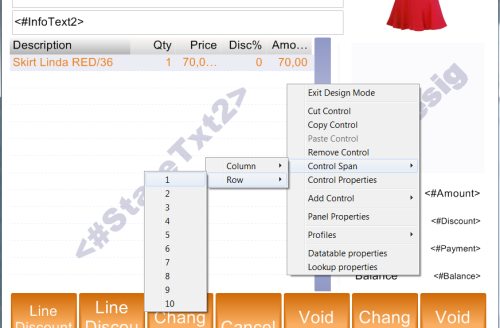
Then using the same Control Span menu item, select the Column and 3 to make the Grid Span over 3 columns.
Next, right-click the Totals Button Pad, select Cut Control, and then right-click the empty area below the Journal Grid on the Left side and select Paste Control.
Now do the same for the Media Control, but paste it into the area next to the Total Control (Column 2 on the Panel). Note that this Column no. 2 is very narrow so the Media Control will first appear very small in that area, so right click it again and change the column span to 2.
Change the column's span of the Input Control and Info (Button Pad Control) to 3 to make them span the 3 columns like the Journal Grid.
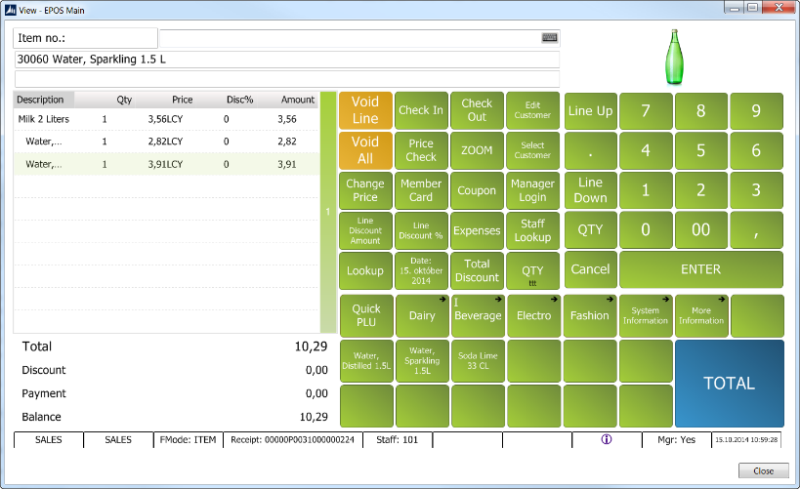
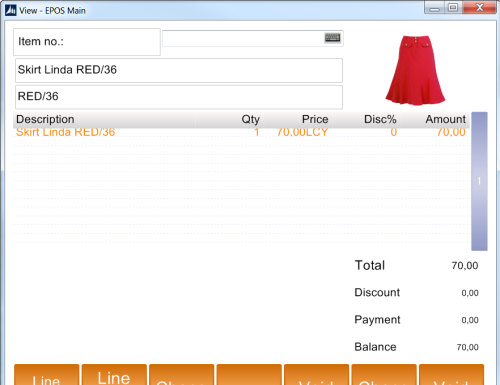
Now our #POS panel looks like this in Portrait Layout.
After these changes we see that the Journal Grid lines are quite narrow. We could make it show fewer lines to fix that problem, but another solution is to configure another size value for this Row when in Portrait Mode.
To do this:
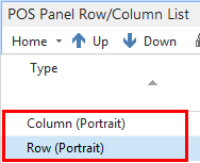
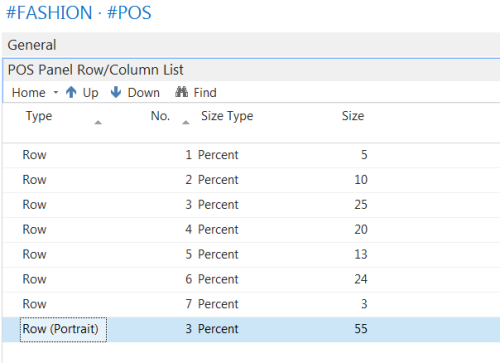
- Open the Panel Properties Card, and add a line to the POS Panel Row/Column List.
- Select the type “Row (Portrait)” and No. 3.
-
Set Size Type to Percent and 55 in the size. You can use whatever value you want here.
Note: This value is greater than the 25 percent when in Landscape Mode. It is okay to make the total percentage here greater than 100; the panel will just adjust each row to a size that is correctly proportional to the total percentage.
-
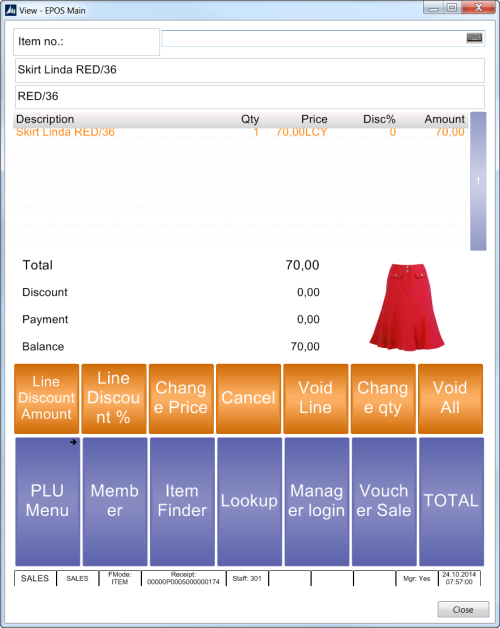
Close the Panel Properties Card and view the final result.
Note: You can now resize the POS Control to switch between Landscape and Portrait Modes and see how the POS Panel layout is automatically adjusted.
Use Case (Using the “Flip Columns/Rows in Portrait”)
The new “Flip Columns/Rows in Portrait” field on the Menus can be useful to adjust menus so that text is better fitted when in Portrait Mode.
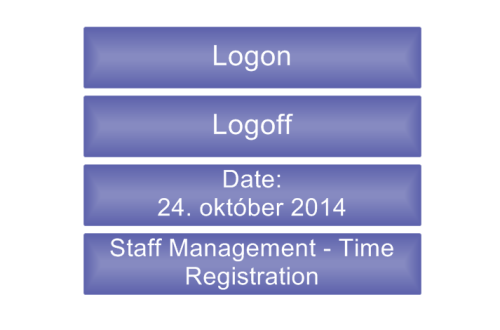
In the Use Case above we adjusted the #POS panel. However, when closing the #POS Panel we enter the #OFFLINE panel and see that the text on the 4 column menu gets a bit jammed.
This can easily be fixed:
- Right-click on the Menu, and select Menu Properties.
- Select the Flip Rows/Columns in Portrait field, and close the Page.
Rows will now be 4 and Columns 1 when in Portrait Mode.